Monday, April 15, 2024

Giddy Up!

Hello Crafty Friends 

It is Pam sharing with you today!

I decided to change it up a bit and do a Western Theme card.  I am featuring the sweet Dog in a Cowboy Boot die on a fancy fold card. The slip in tag can hold a greeting and gift card.  This fancy fold was inspired by Beth over at SplitcoastStampers.

                                                                                                                                                     Background picture from Freepiks


Designer Steps:

1.  Use a dark brown A2 card base and cut the front flap at a diagonal save the cut off triangle.  Cut a piece of double sided designer paper 4 1/8 x 5 3/8.  Take the double sided designer paper and cut it at a diagonal as shown above
2.  Glue one side of the designer paper to the left flap and the other side of the piece to the triangle that is not attached yet.  Next put a thin line of glue on the outter edge and bottom of the unattached triangle and then glue it to the front of the card.  This will create a pocket
3.  Cut a piece of dark brown card stock 5 x 3 3/4 and a piece of stripped designer paper 4 3/4 x 3 1/2.  Round the corners and glue together
4.  Decorate the inside piece as you wish.  I am going to use it as a gift card holder.  Once decorated slip the stripped piece inside of the pocket

5.  Using the Dog in a Cowboy Boot die cut out the pieces and ink the edges before assembly
6.  Cut a strip of brown card stock 1 x 11.  Use a punch on cream colored card stock to create the scallop.  Cut one 2 inch cream colored circle and ink.  Cut one 2 1/4 inch circle in dark brown.  Glue the circles together
7.  Wrap the band around the card and secure it to the card back.  Glue the circles to the center and then add the Boot and your sentiment.  Your card is complete


We have more inspiration on our YouTube Channel check it out HERE

Thanks so much for stopping by!  And I will see you next Thursday.

Blessings and Take Care


Saturday, April 13, 2024

Dreamin' About Cake

  Hello Friends

Today's post is for the House-Mouse Monday Challenge!  The challenge is Anything Goes or Designer Paper.  I decided to do a birthday card using designer paper.  The stamp is called Cake Dreamer.  Check out the fun challenge HERE!


This is such a perfect challenge for using those cute little House-Mouse and Happy Hopper Stamps!  Come and join the fun!


Thanks for taking a peek!

Blessings,


Sunday, April 7, 2024

Just Bee-cause

Hello Friends

My supply of cards is running a little low so I thought I would make one that could be used for multiple occasions such as thinking of you, miss you, just because and so on.  I did a fancy fold that I have done in the past that I just love.  I am featuring two dies: Bee Gnome and Flowers.

Background photo by FreePiks
Design Steps: (Here is a link to a video that I used to make the base https://www.pinterest.com/pin/443534263317816376/ )
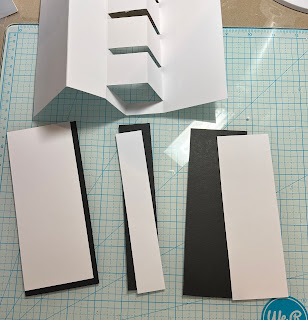
1.  Start with a piece of white card stock measuring 10 x 6 3/4.  Score at 3, 4 1/2, 6, 7 1/2
2.  Fold the flap back along the 6 inch score. Place a ruler at the bottom along the fold and use a pencil to mark small dots at 1/2, 1 3/4, 2, 3 1/4, 3 1/2, 4 3/4, 5, 6 1/2
3.  Place your card into a paper cutter and cut from the dots to the closest score line as shown above
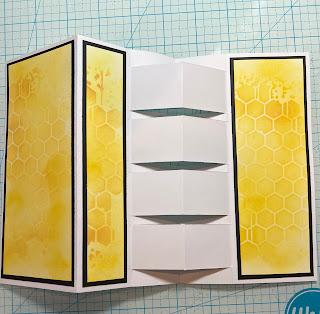
4.  When you have completed the cuts fold as shown below


5.  To cover the panels cut 2 black pieces 6 3/8 x 2 3/4, 2 white pieces 6 1/4 x 2 1/2, 1 black piece 6 3/8 x 1 1/4 and 1 white piece 6 1/4 x 1 1/8
6.  I used a honeycomb stencil to decorate the white panels and 2 colors of yellow ink
7.  I then splattered the panels with the darker yellow ink
8.  Glue the panels together and then add to the white card base
9.  Glue down the 8 black rectangles as shown above
10.  Use the Flowers and the Bee Gnome dies and cut out the pieces
11.  Shade the pieces and then assemble
12.  Stamp the sentiment and layer onto black card stock.  Decorate with front as shown above.  Cut out the letters in yellow and shade then add to the card.  Finish adding the flowers and bees and your card is complete


We have more inspiration on our YouTube Channel check it out HERE

Thanks so much for stopping by!  And I will see you next Thursday.

Blessings and Take Care


Thursday, March 28, 2024

Spring Time

 Hello Friends,

I thought I would make a few spring cards for my family who have had a rough winter back in Ohio and New York.  I must say I love Arizona winters!  No snow to shovel and no winter coats for me!  I guess our extremely hot summers are our winters.  We stay inside during the summer and play during our winter!!

This card was inspired by a beautiful card by Wanda Guess.  The design and dies are a little different but I really love how it turned out.  I used a larger card to accomodate the dies I chose.  It is a 5 x 7 card.  The dies I am featuring are Nest with Eggs, Spring Bunnies, Spring Daffodils & Eggs,  Hello Spring Bloom, Garden Butterflies and Bees and Bird Trio.

                                                                                                                      Background Photo Freepiks 

Design Steps:
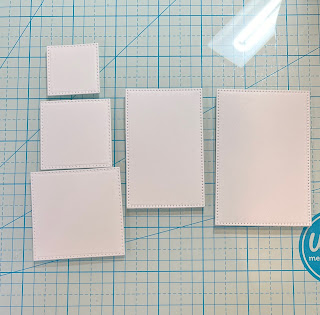
1.  White base card is 5 x 7 when folded, kraft card stock 4 7/8 x 6 7/8 and white card stock 4 3/4 x 6 3/4
2.  Using the Pierced Square Set the 6th, 7th and 8th from the largest square cut out the squares in white.  Using the Pierced Rectangle Set the 4th and 5th from the largest rectangle cut out the retangles in white
3.  Use a blending brushe and blue ink to cover the top half of the rectangles and squares as shown above
4.  Take the white piece of card stock measuring 4 3/4 x 6 3/4 and lay out the retangles and squares as shown above.  When you have them as you like place dimension tape on the back of the retangles and squares then pop them to the white panel

5.  Using the Nest with Eggs die cut out the nest in kraft and the eggs in white.  Using the Spring Bunnies cut out the sitting bunny in Kraft.  Using the Bird Trio cut it out in white.  Using the Spring Daffodils & Eggs die cut it out in white.  Using the Hello Spring Bloom cut the word spring out twice in black and glue together.  Using the Garden Butterflies and Bees cut the butterfly out in kraft and white
6.  Use Copics and inks to color the dies and then glue together as shown above
7.  Glue the dies to the retangles and squares as shown above.  Splatter the card with white and blue ink. Add a little stamp sentiment that says time.  Glue the panel to the 4 7/8 x 6 7/8 kraft card stock and then onto the card base.  Your card is complete


We have more inspiration on our YouTube Channel check it out HERE

Thanks so much for stopping by!  And I will see you next Thursday.

Blessings and Take Care